Showing posts with label Mac. Show all posts

Saturday, March 14, 2009

Let Mail Help You With That Word

Ever been in a situation where you are typing a word and you just can't remember how to spell it? You could try to spell it the way you think is right but then you feel like an uneducated fool when you realize, "oh yes, of course that's how it's spelled! What was I thinking?"

Mac OS X's built in Mail application can help you avoid that personal embarrassment. When you are typing up an email and need to figure out how to get the spelling right, type the first few characters of the word and press Escape. Suddenly, like magic, a drop down list of words will appear that match those characters. Find the word you want, click on it, and Mail fills in the rest.

Thanks Mail! You've done us all a wonderful service.

Tuesday, February 24, 2009

Hiding The Dock

Here's a quick tip you might find useful. The Dock is great but there are times where it might get in the way of your work. This is especially true for MacBooks with 13" screens.

For an incredibly quick way to hide the Dock, simply press Command + Option + D. This will slide the Dock off your screen so you can take full advantage of the Desktop. When you want to bring it back full time, just press that key combination again.

Safari 4 Beta Released

Happy Tuesday! Apple has given us a true gift from the heavens. Starting today, you can download Safari 4, the new version of their popular web browser. You can download it here for Mac OS X (Tiger or Leopard) and Windows XP and Vista.

New features include:
  • Nitro engine. A fast Javascript engine that renders 4x faster the previous version of Safari, up to 30x faster than IE, and 3x faster than Firefox. Buckle up for safety.
  • Top Sites. A new page built into the browser with thumbnails of all your commonly visited sites. It makes for easy access to your favorite online haunts. If you've used Opera of Google Chrome, this feature will be familiar to you.
  • Cover Flow. Love it or hate it, Apple has integrated Cover Flow into your bookmarks. Now you can just scroll your bookmarks like album covers in iTunes.
  • Nifty search features! Now you can easily search your entire browsing history. The search bar has been tweaked and now offers suggestions and previous searches as you are typing in your criteria.
  • A new facelift. There's a lot of little modifications to the look and feel of the browser as well as some big ones. For one, the page tabs are now located at the top of the browser, much like Google Chrome. For Windows users, you'll find the interface to fall more in line with your other native applications versus the previous version of Safari.
For a more complete list of features, check out the Safari homepage.

Even though it's a beta, Safari 4 seems pretty stable and very fast. I've tried it on both Windows and Mac OS X and, so far, am very impressed. Give it a spin and let everyone know what you think of it in the comments.

Sunday, February 8, 2009

Using Disk Utility To Protect Important Files

Need an easy to protect some important documents or files? We've covered securing your home folder in Mac OS X using FileVault but this won't cover you if you are storing data outside that location. A great example of this is offsite storage.

Let's say you have some financial records on your computer. You keep them safe on your Mac but you want to keep a copy someplace else in the event your hard drive fails or (worse) you lose your home in a disaster. Be it a USB flash drive kept at a friend's house or your trusty iDisk, there is a way to keep those important files safe from prying eyes. The best part? You can do it with tools built right into Mac OS X.

To do this, open the Utilities folder under Applications. Next, open Disk Utility.app. This is where the fun begins.

On the top of the Disk Utility application, click the New Image button. A window will drop down with several options. This process will create a DMG (Disk Image) file that you can mount on any Mac and drop files into. You are probably familiar with DMG files as they are commonly used to package OS X applications that you download from the Internet. Unlike those, however, we are going to encrypt ours.

On the top, next to Save As, give it a name. This is the name of the DMG file. You can call it anything you'd like. On the lower part of the window you are asked to provide a Volume Name. Again, this is up to you. Next you can choose a volume size. Make sure you make it big enough to fit all the files you want to protect but don't make it too large as you'll just end up wasting space. You can leave the Volume Format alone. Unless you know what you are doing, there's no need to change this.

Finally, choose an option under Encryption. 128-Bit AES Encryption is pretty secure, however, if you want to feel really secure about your data, you can opt for the stronger 256-bit AES. When you have made your choice, click the Create button. 

When the encryption process begins, you'll be asked to provide a password. You know the drill: Make it easy for you to remember but hard for others to figure out. Disk Utility even offers you a security gauge as you type so you know you've made a good one. Make sure you remember this password! If you forget it, all of the data stored inside this DMG file will be inaccessible.

You now have a secure disk image that you can use to protect important files, no matter where you store it. When you open the DMG file and enter the password, it will mount the disk right on your desktop so you can treat it like any other storage device. Once you "eject" it, your files are protected from prying eyes. Couldn't be easier!

Thursday, February 5, 2009

Syncing iDisk Locally To Your Mac

MobileMe is the service everyone wants to love but doesn't always live up to everyone's expectations. In this brave new world of iPhones it would seem that its most useful feature is syncing your data between your Mac and your iPhone. MobileMe can do a lot more than this and much of that functionality will be covered on this blog in the future. Today however, let's talk about iDisk.

iDisk is part of MobileMe and it works just like a network share or a flash drive. The difference is that iDisk lives "in the cloud" (online). You can access it from anywhere you can get an Internet connection (and where can't you find Internet these days). It's a great way to deposit files in a location independent of your Mac so you can access them somewhere else. In fact, you don't even need a Mac to use it! Logging into Me.com will let you use iDisk using a web interface. Nifty.

Let's say, hypothetically, you have your trusty MacBook with you on a long road trip. It's getting late and you are tired. You pull into a hotel and get a room. Before going to sleep, you decide to write a few pages of the next great American novel. You've been keeping it on your iDisk so you can work on it from your iMac at home and your MacBook on the go. You look for that data port in your room. It's not there. Well, surely they have WiFi. What's this? There's NO WiFi? There's No Internet At All!?! This is beginning to sound like a horror flick. The people running that hotel should be punished for their cruelty.

If only you could access your iDisk offline. As it turns out, you can.

Go to System Preferences and click on MobileMe. Next, click on the iDisk button at the top of the window. At the bottom of this window there is an option for iDisk Sync. Click the Start button. That's it. That's all you have to do. From here, Mac OS X will keep a local copy of your iDisk and it will sync the changes automatically when you are online. If you would rather sync your data manually, you can change it here as well.

Now get to work on that novel! Having no Internet is no excuse to slack off now.

Monday, February 2, 2009

Securing Your Data With FileVault

Portable computers have become so popular that notebooks/laptops have begun to outsell the venerable desktop PC. Apple's product line is no different. In fact, as announced back in October of last year, the MacBook is the best selling Mac in history. Not bad for a machine was that born only two years prior.

If you have a MacBook/Air/Pro that you carry with you everywhere, you might be concerned about what happens to your data should it get stolen. Short of having your MacBook recovered you can wave goodbye to any data you had stored there. You can still protect it from anyone else ever seeing it, though. Enter FileVault.

FileVault is a feature built into Mac OS X that turns your home folder into an impenetrable fortress! Well, maybe not impenetrable, but it makes things more secure. FileVault takes your home folder, copies it into an encrypted file, and password protects it. Unless someone can log into your account or knows the Master Password for the machine, your data is safe from prying eyes. It's pretty easy to setup.

Open System Preferences and click Security. Click the FileVault button on the top of the window to bring up its preferences. 

Click Set Master Password and create a password that can be used to unlock your FileVault in case you forget your login. Make sure you don't forget this password. If you forget your login password and you forget the Master Password, your FileVault is essentially a junk file as far as you are concerned.

Once your Master Password is set, click Turn On FileVault. From here, Mac OS X will begin the process of securing your data. Be patient. Very patient. This process takes time. Go play with another Mac, rent a movie on Apple TV, or go outside for some fresh air (don't forget to bring your iPod).

Before you go through this process, take these concerns in mind. When you turn on FileVault you can choose a "secure delete". During the process of encryption, FileVault copies your data into the secure file. When it completes this process, your old home folder is deleted. A secure delete helps prevent this data from being retrieved by disk recovery tools. It can give you piece of mind but it will also increase the completion time greatly. 

Another concern relates to Time Machine. If you encrypt your home folder on a version of Mac OS X prior to Leopard (10.5), Time Machine will see your encrypted home folder as one file. Since your home folder is constantly changing, it will be backed up in its entirety. This is a huge waste of time and disk space. Time Machine can backup your data within a FileVault created with OS X Leopard but there's still a catch. In order for Time Machine to backup your data, you will need to be logged out. This may or may not be an inconvenience to you.

If you are looking for security on your MacBook, FileVault is a good place to start. It will give you a little more security out there in the wilds.

Tuesday, January 27, 2009

iLife 08 Update Now Available

Fresh off the heels of their release of iLife '09, it looks like iLife '08 is getting some attention with a new update. This update addresses stability and other minor issues with iDVD and the iLife Media Browser.

The updates for both can be obtained through Software Update. If your system is configured to automatically update, you should be prompted to update soon.  For the impatient, you run Software Update manually. On the menu bar, click the Apple icon and select Software Update.

Saturday, January 24, 2009

Happy 25th Birthday To The Mac


It was January 24th, 1984 when Apple introduced the world to the Macintosh. 25 years later, Apple's Mac platform is alive and well with millions of faithful fans. There has been a lot of stories about the Mac in the media over the last week in celebration of this day so I decided to post links to a few of them here.

Friday, January 23, 2009

Using Active Screen Corners

There's a very helpful feature in Mac OS X that lets you activate the four corners of your screen to do various functions. It's called "Active Screen Corners" and it is very easy to configure. Here's how.

First, open "System Preferences" and select "Expose & Spaces". Click on the "Expose" button at the top of this window. The top portion of this window shows you a small thumbnail of the OS X desktop (showing off the very cool Aurora background you see when you first turned on your Mac). At each corner of this thumbnail you will see a drop down menu. 


These menus offer you several options ranging from activating your Screen Saver, bringing up the Dashboard, or even sliding all of the windows off to the side so you can view your Desktop (handy when working with files hidden by pesky windows). If you activated Spaces, you can even use Active Screen Corners to display them all. 

Now that you have assigned some Active Screen Corners, how do you use them? Even easier. Just move your mouse into the corner and the assigned action will execute. Play around with them and find the right combination for you. Not only does this make OS X a little more efficient, it also makes things a little more fun!

Tuesday, January 20, 2009

Bought A New Mac? Get iLife '09 At A Discount

I just read on TUAW that Apple has started their "iLife '09 Hardware Up-to-Date" program. If you bought a Mac on or after January 6th, 2009 and it did not come with iLife '09 installed, you are entitled to upgrade for $9.99 (the retail price of this software is $79.99).

To take advantage of this offer, you will need to have a qualifying Mac purchased on or after the January 6th date and fill out the appropriate form. Before you know it, you'll be taking guitar lessons with Sting and sorting your pictures of Sting like never before!

This offer stands until March 28th, 2009 so if you have a qualifying Mac, act quickly.

Using Your Apple In-Ear Headphones In Mac OS X

Did you pick up a pair of Apple's new In-Ear Headphones for your iPod? Unlike the stock ear buds, these babies go right in your ear canal and block out the sounds around you. The audio quality is also much improved.

The coolest feature of these headphones, however, is the small remote control built-in to the wire. When used with a current generation iPod, you can control the volume, pause/play your music, and even skip tracks. As it turns out, this feature isn't exclusive to iPods. They also work with the new "unibody" MacBook and MacBook Pro.

If you have a unibody Macbook or MacBook Pro (the ones with the glass and black trim around the screen), that remote will work just fine when you are listening to music in iTunes.

A note to MacBook Air owners: Despite being considered unibody, the remote on the In-Ear Headphones do not work with the MacBook Air's headphone jack. You can still enjoy the sound from the headphones but the remote does not function. Bummer.

Sunday, January 18, 2009

The Power Of Spaces

Mac OS X Leopard introduced a new feature called Spaces. Spaces allows you to create multiple desktops so you have more room to work. Some people (like me) can't live without this feature. Others don't really see the advantage. If you are one of those "others", then it's time to pay attention. This one is for you.

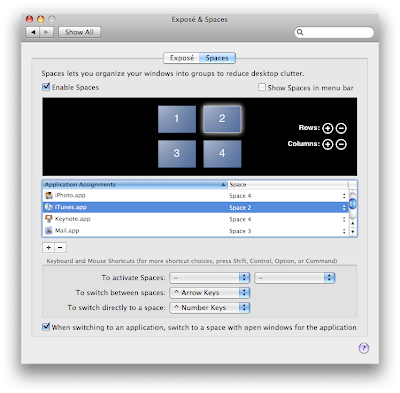
Spaces is pretty easy to enable. Open System Preferences and click on Expose & Spaces. Click on the Spaces button at the top of the window. Finally, check the box labeled Enable Spaces.

Spaces is now enabled and ready to use. From this same menu, you can layout your Spaces by adding rows and columns. You can assign a Fn key to bring up a view of all your Spaces. When viewing all Spaces, you can drag windows from one to another. To quickly view a neighboring Space, press Control + Arrow Key in the direction of the Space you want to move to. If you know the number of the Space you want to go to, you can press Control + Number to move directly to it.

Ok, so you have more room to drag windows to. Big deal. Well, the real power of Spaces comes into play when you assign applications to different Spaces. Think of it like anchoring apps to a Space. This is a great way to break up your web browsing, communications, productivity, entertainment... well, you get the idea.

Assigning apps to a Space is done in the same Expose & Spaces preferences window we've been using for this exercise. Click the + button under the columns in the middle of the window. The drop down list will show you apps that are currently running and not assigned to a Space. Clicking Other will let you pick any app on your computer. Once you have chosen an app, you will see it show up in the Application Assignments column. To the right of that column is a second one called Space.  Here you can assign the app to a Space or to all Spaces simultaneously. Now when you launch this app, it will open in the assigned Space no matter which one you are currently viewing. This works great for clumping similar apps together and keeping your work environment clean and tidy.

If you haven't used Spaces before, this should get you started. If you have used them before but you never found the charm, hopefully this will get you to take another look. If you have any questions or comments, please post them in the comments section.

Saturday, January 17, 2009

Taking Screenshots in Mac OS X

Although you can do it with just about any operating system, Mac OS X delivers some great screenshot capabilities right out of the box. Not only can you capture a screenshot of your entire desktop, you can grab individual windows or even a particular section of the screen.

To capture your desktop, press Command + Shift + 3. You'll hear the shutter sound from a camera and in a moment, you'll have a PNG file of your entire screen sitting on the Desktop. Pretty easy!

But what if you only want an image of a particular part of the screen? Maybe you just want a snapshot from a portion of a webpage. You could take a screenshot of your desktop and use image manipulation software to crop the image to just the part you need. Mac OS X has a better way.

To capture a portion of your screen, press Command + Shift + 4. This will turn your mouse cursor into a cross hair. Hold down the mouse button and drag it across the screen. You'll see a bounding box grow from the point you held down the button. When you let go, you will hear the camera shutter and the part of the screen inside the bounding box will become a PNG image on the Desktop. Yep, just like the previous exercise.

Ok, so you like the ability to take a snapshot of a portion of the screen but you just want an entire window or dialog box. You can drag the mouse around the object, but there's room for error. Again, Mac OS X has you covered. 

Give this a try. Press Command + Shift + 4 again. You will get the now familiar cross hairs. Now, instead of clicking the mouse button, press the Spacebar. Your mouse cursor changes into a camera icon. When you move the camera to different objects, they will highlight. Click the mouse button and the highlighted object will become a PNG on the Desktop. The PNG image contains only the window you need. It can be a real time saver!

A final note on that last trick. It works on just about any object on your screen. Windows, desktop icons, dialog boxes, even the Dock. Give it a try!

Tuesday, January 13, 2009

Turning Websites To Apps With Fluid

Thanks to Web 2.0 and this whole "cloud computing" trend you probably find yourself using websites like you would a desktop application. Webmail, online calendars, Internet radio, these are all examples of websites that function like applications.  One of the downsides of using these sites is that they work inside your browser. If you've ever had your browser crash while you have Google Docs or Pandora open you know how annoying this can be.  Don't you wish you could run these services as a desktop application, completely free from your browser?

Enter Fluid.  This simple application lets you run any webpage as an application right inside Mac OS X.  Yes, it is like magic!  It's also very easy to use.  Fluid creates a Site Specific Browser for any site you want to run independent of your regular web browser.  Additionally, the apps you create with Fluid sit in your Applications folder just like any other app.  Some sites (like Google Reader) even show a number badge on the Dock icon when new stories are available.  Now if your browser crashes on a website, your apps will continue to run strong!

Interested? Check out Fluid's website for more details and to download this heavenly utility.

Monday, January 12, 2009

Expand Your Media Center With Boxee

When it comes to Mac OS X's Front Row application, people love it or hate it.  It's a nice interface, however, it tends to be a little limited in what it can do.  If you are looking for your Mac to do a little more work as a media center and Front Row isn't quite cutting it, you might want to look into Boxee.

Boxee, now in open alpha, runs on Mac OS X, Linux, and Apple TV.  It provides a beautiful front end that allows you to access your media located on your computer.  Where it really stands out is the social networking aspects and the way it connects to various online services.

Boxee lets you see what your friend's are watching and allows you to make recommendations to your friends on content that you've watched.  It works great and could be quite useful for spreading the word about an episode of your favorite TV show or movie.  It's also a fun way to find new things you might not have considered checking out on your own.

Sure, it will play the movies, music, TV shows, and podcasts you have stored on your hard drive, but it doesn't stop there.  You also have access to the library of content from some of the biggest online providers.  Revision 3, Joost, The WB, CBS, and even Hulu are all represented here and you can access them all without leaving the comfort of the Boxee interface.  This alone makes it a killer app for anyone wanting to get online content in one convenient place.

With some hacks, you can run Boxee on your Apple TV, making it an even more powerful home theater component.  If you have a Mac Mini or an iMac in the bedroom, it can transform that computer into a television with a tremendous amount of on demand content.

If you have a Mac or Apple TV (or a Linux machine for that matter), you really owe it to yourself to check out Boxee.  Check it out at Boxee.tv.

Saturday, January 10, 2009

Putting Your Mac On A Sleep Schedule

These days it seems like everyone needs a "home server" to host media for their computers, game consoles, Apple TVs, and countless other devices.  While any computer with enough storage can provide this service, it can be a real energy waster during idle times.  Do you really need your computer running all day while you are at work?

If not, you can easily schedule your Mac to go to sleep at a scheduled time and wake up automatically.  Here's how it works:

First, open "System Preferences" and click "Energy Saver". It's the icon with the little lightbulb.

Next, click the "Schedule" button in the lower right hand corner of the window.

Now you can setup your schedule however you'd like! You can even tell OS X to only follow this schedule on Weekdays or Weekends.  

As cool as this feature is, you probably wouldn't have much use for it on a MacBook. Still, it can be very handy if you have a desktop and want to cut down that electric bill.