Thursday, January 29, 2009

Upgrade Your iTunes Library At Your Own Pace

Funny, I was just complaining about this yesterday. When Apple announced that iTunes was going DRM free they offered to let customers upgrade their current DRM'd songs for 30 cents a song. Unfortunately, this offer was an all or nothing proposition. You had to upgrade all of your songs at once.

As of today, you can now upgrade the songs you want, when you want. This is great for people who have a large library of iTunes purchased music.  Even if you want to get all of your songs DRM free, spending the upgrade cost all at once could be prohibitive.  Now you can do your upgrade over time. 

Now, which songs do I want to upgrade first?

Tuesday, January 27, 2009

iLife 08 Update Now Available

Fresh off the heels of their release of iLife '09, it looks like iLife '08 is getting some attention with a new update. This update addresses stability and other minor issues with iDVD and the iLife Media Browser.

The updates for both can be obtained through Software Update. If your system is configured to automatically update, you should be prompted to update soon.  For the impatient, you run Software Update manually. On the menu bar, click the Apple icon and select Software Update.

iPhone and iPod touch Updated To Version 2.2.1


Yay! A new version of software is now available for iPhone and iPod touch. Version 2.2.1, to be exact. Nothing too exciting, but here's a list of changes:
  • Improved stability of Safari
  • Fixed issue where some images saved from Mail do not display correctly in Saved Photos
  • Fixed issue that caused some Apple Lossless (ALAC) audio files to skip during playback
Seems like a worthy update. Safari seems to be getting more and more stable as time goes on. Prior to the last update, I had Safari crash almost constantly. Nice to see that it is continuing to get the love. The update can be yours the next time you sync your iPhone/iPod touch to iTunes. 

Saturday, January 24, 2009

Happy 25th Birthday To The Mac


It was January 24th, 1984 when Apple introduced the world to the Macintosh. 25 years later, Apple's Mac platform is alive and well with millions of faithful fans. There has been a lot of stories about the Mac in the media over the last week in celebration of this day so I decided to post links to a few of them here.

Friday, January 23, 2009

Using Active Screen Corners

There's a very helpful feature in Mac OS X that lets you activate the four corners of your screen to do various functions. It's called "Active Screen Corners" and it is very easy to configure. Here's how.

First, open "System Preferences" and select "Expose & Spaces". Click on the "Expose" button at the top of this window. The top portion of this window shows you a small thumbnail of the OS X desktop (showing off the very cool Aurora background you see when you first turned on your Mac). At each corner of this thumbnail you will see a drop down menu. 


These menus offer you several options ranging from activating your Screen Saver, bringing up the Dashboard, or even sliding all of the windows off to the side so you can view your Desktop (handy when working with files hidden by pesky windows). If you activated Spaces, you can even use Active Screen Corners to display them all. 

Now that you have assigned some Active Screen Corners, how do you use them? Even easier. Just move your mouse into the corner and the assigned action will execute. Play around with them and find the right combination for you. Not only does this make OS X a little more efficient, it also makes things a little more fun!

Tuesday, January 20, 2009

Bought A New Mac? Get iLife '09 At A Discount

I just read on TUAW that Apple has started their "iLife '09 Hardware Up-to-Date" program. If you bought a Mac on or after January 6th, 2009 and it did not come with iLife '09 installed, you are entitled to upgrade for $9.99 (the retail price of this software is $79.99).

To take advantage of this offer, you will need to have a qualifying Mac purchased on or after the January 6th date and fill out the appropriate form. Before you know it, you'll be taking guitar lessons with Sting and sorting your pictures of Sting like never before!

This offer stands until March 28th, 2009 so if you have a qualifying Mac, act quickly.

Using Your Apple In-Ear Headphones In Mac OS X

Did you pick up a pair of Apple's new In-Ear Headphones for your iPod? Unlike the stock ear buds, these babies go right in your ear canal and block out the sounds around you. The audio quality is also much improved.

The coolest feature of these headphones, however, is the small remote control built-in to the wire. When used with a current generation iPod, you can control the volume, pause/play your music, and even skip tracks. As it turns out, this feature isn't exclusive to iPods. They also work with the new "unibody" MacBook and MacBook Pro.

If you have a unibody Macbook or MacBook Pro (the ones with the glass and black trim around the screen), that remote will work just fine when you are listening to music in iTunes.

A note to MacBook Air owners: Despite being considered unibody, the remote on the In-Ear Headphones do not work with the MacBook Air's headphone jack. You can still enjoy the sound from the headphones but the remote does not function. Bummer.

Sunday, January 18, 2009

The Power Of Spaces

Mac OS X Leopard introduced a new feature called Spaces. Spaces allows you to create multiple desktops so you have more room to work. Some people (like me) can't live without this feature. Others don't really see the advantage. If you are one of those "others", then it's time to pay attention. This one is for you.

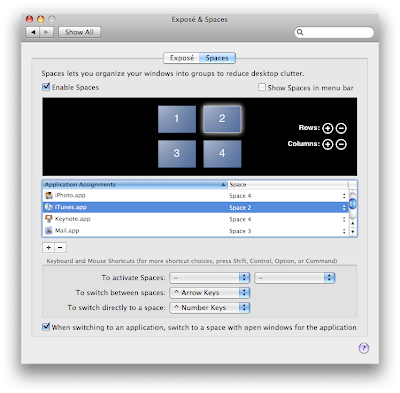
Spaces is pretty easy to enable. Open System Preferences and click on Expose & Spaces. Click on the Spaces button at the top of the window. Finally, check the box labeled Enable Spaces.

Spaces is now enabled and ready to use. From this same menu, you can layout your Spaces by adding rows and columns. You can assign a Fn key to bring up a view of all your Spaces. When viewing all Spaces, you can drag windows from one to another. To quickly view a neighboring Space, press Control + Arrow Key in the direction of the Space you want to move to. If you know the number of the Space you want to go to, you can press Control + Number to move directly to it.

Ok, so you have more room to drag windows to. Big deal. Well, the real power of Spaces comes into play when you assign applications to different Spaces. Think of it like anchoring apps to a Space. This is a great way to break up your web browsing, communications, productivity, entertainment... well, you get the idea.

Assigning apps to a Space is done in the same Expose & Spaces preferences window we've been using for this exercise. Click the + button under the columns in the middle of the window. The drop down list will show you apps that are currently running and not assigned to a Space. Clicking Other will let you pick any app on your computer. Once you have chosen an app, you will see it show up in the Application Assignments column. To the right of that column is a second one called Space.  Here you can assign the app to a Space or to all Spaces simultaneously. Now when you launch this app, it will open in the assigned Space no matter which one you are currently viewing. This works great for clumping similar apps together and keeping your work environment clean and tidy.

If you haven't used Spaces before, this should get you started. If you have used them before but you never found the charm, hopefully this will get you to take another look. If you have any questions or comments, please post them in the comments section.

Make Your Own iPhone Web Apps

Sometimes, some of the most useful features of an application go unnoticed despite being right in front of your eyes. Take, for example, the ability to make your own web apps for the iPhone/iPod touch right from Safari. This feature is pretty overlooked since the App Store was launched but it can still have its uses.

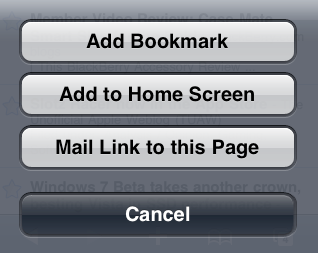
If you find yourself using a particular webpage very frequently, simply press the + icon on the bottom of Safari. A menu with appear with a few options. Click "Add To Home Screen"

From here, you can give it any name you'd like. When you are finished, press "Add" in the upper right. Now your home screen will have an app for that webpage.

A useful scenario for this feature would be when accessing webpages that function like applications already. A great example of this is Google. Google makes a great app for the iPhone which lets you access many of their services, such as Google Talk and Google Reader (two of my personal favorites). Unfortunately, it takes a few clicks to reach these pages from inside the Google application. With this Safari feature, you can make an app for each one making them just a single click away from the home screen.

Pretty handy, yes?

Saturday, January 17, 2009

Taking Screenshots in Mac OS X

Although you can do it with just about any operating system, Mac OS X delivers some great screenshot capabilities right out of the box. Not only can you capture a screenshot of your entire desktop, you can grab individual windows or even a particular section of the screen.

To capture your desktop, press Command + Shift + 3. You'll hear the shutter sound from a camera and in a moment, you'll have a PNG file of your entire screen sitting on the Desktop. Pretty easy!

But what if you only want an image of a particular part of the screen? Maybe you just want a snapshot from a portion of a webpage. You could take a screenshot of your desktop and use image manipulation software to crop the image to just the part you need. Mac OS X has a better way.

To capture a portion of your screen, press Command + Shift + 4. This will turn your mouse cursor into a cross hair. Hold down the mouse button and drag it across the screen. You'll see a bounding box grow from the point you held down the button. When you let go, you will hear the camera shutter and the part of the screen inside the bounding box will become a PNG image on the Desktop. Yep, just like the previous exercise.

Ok, so you like the ability to take a snapshot of a portion of the screen but you just want an entire window or dialog box. You can drag the mouse around the object, but there's room for error. Again, Mac OS X has you covered. 

Give this a try. Press Command + Shift + 4 again. You will get the now familiar cross hairs. Now, instead of clicking the mouse button, press the Spacebar. Your mouse cursor changes into a camera icon. When you move the camera to different objects, they will highlight. Click the mouse button and the highlighted object will become a PNG on the Desktop. The PNG image contains only the window you need. It can be a real time saver!

A final note on that last trick. It works on just about any object on your screen. Windows, desktop icons, dialog boxes, even the Dock. Give it a try!

Friday, January 16, 2009

500 Million And Counting

Apple has announced that its wildly popular App Store has served 500 million apps since it opened July 10, 2008.  Currently there are 15,000 apps to choose from in the store and they range from productivity apps, games, utilities, and more.  According to AppleInsider, downloads have doubled since early December.  It's not unreasonable to guess that this increase is due to holiday sales of the iPhone and iPod touch.

The App Store is Apple's online marketplace for distributing applications for their popular iPhone and iPod touch platform. It is accessible from the devices themselves or via iTunes. Applications on the store are written by individuals, large companies, and even Apple. Apps are available either free of charge or for various prices determined by the developer.

Have you downloaded apps from the App Store?  Any particular favorites?  Please feel free to post them in the comments!

Wednesday, January 14, 2009

Steve Jobs Takes Medical Leave From Apple

Apple Inc. CEO Steve Jobs has announced that he is taking a leave of absence from the company until the end of June due to health problems.  In his absence, COO Tim Cook will be taking care of the day-to-day operations of the company.  Steve released a statement to employees explaining this decision.

I am sure all of you saw my letter last week sharing something very personal with the Apple community. Unfortunately, the curiosity over my personal health continues to be a distraction not only for me and my family, but everyone else at Apple as well. In addition, during the past week I have learned that my health-related issues are more complex than I originally thought.

In order to take myself out of the limelight and focus on my health, and to allow everyone at Apple to focus on delivering extraordinary products, I have decided to take a medical leave of absence until the end of June.

You can read the entire letter here

In 2004, Steve Jobs was diagnosed with pancreatic cancer. He conquered the disease but over the course of 2008 his sudden weight loss was heavily discussed in the media. Prior to last week's MacWorld even in San Francisco, Steve attributed this weight loss to a hormone imbalance. Whatever the reason, hopefully he will be back to himself com July. In the meantime, there's no need to panic! Apple will be in very capable hands.

Tuesday, January 13, 2009

Turning Websites To Apps With Fluid

Thanks to Web 2.0 and this whole "cloud computing" trend you probably find yourself using websites like you would a desktop application. Webmail, online calendars, Internet radio, these are all examples of websites that function like applications.  One of the downsides of using these sites is that they work inside your browser. If you've ever had your browser crash while you have Google Docs or Pandora open you know how annoying this can be.  Don't you wish you could run these services as a desktop application, completely free from your browser?

Enter Fluid.  This simple application lets you run any webpage as an application right inside Mac OS X.  Yes, it is like magic!  It's also very easy to use.  Fluid creates a Site Specific Browser for any site you want to run independent of your regular web browser.  Additionally, the apps you create with Fluid sit in your Applications folder just like any other app.  Some sites (like Google Reader) even show a number badge on the Dock icon when new stories are available.  Now if your browser crashes on a website, your apps will continue to run strong!

Interested? Check out Fluid's website for more details and to download this heavenly utility.

Monday, January 12, 2009

Expand Your Media Center With Boxee

When it comes to Mac OS X's Front Row application, people love it or hate it.  It's a nice interface, however, it tends to be a little limited in what it can do.  If you are looking for your Mac to do a little more work as a media center and Front Row isn't quite cutting it, you might want to look into Boxee.

Boxee, now in open alpha, runs on Mac OS X, Linux, and Apple TV.  It provides a beautiful front end that allows you to access your media located on your computer.  Where it really stands out is the social networking aspects and the way it connects to various online services.

Boxee lets you see what your friend's are watching and allows you to make recommendations to your friends on content that you've watched.  It works great and could be quite useful for spreading the word about an episode of your favorite TV show or movie.  It's also a fun way to find new things you might not have considered checking out on your own.

Sure, it will play the movies, music, TV shows, and podcasts you have stored on your hard drive, but it doesn't stop there.  You also have access to the library of content from some of the biggest online providers.  Revision 3, Joost, The WB, CBS, and even Hulu are all represented here and you can access them all without leaving the comfort of the Boxee interface.  This alone makes it a killer app for anyone wanting to get online content in one convenient place.

With some hacks, you can run Boxee on your Apple TV, making it an even more powerful home theater component.  If you have a Mac Mini or an iMac in the bedroom, it can transform that computer into a television with a tremendous amount of on demand content.

If you have a Mac or Apple TV (or a Linux machine for that matter), you really owe it to yourself to check out Boxee.  Check it out at Boxee.tv.

Sunday, January 11, 2009

Topple For iPhone and iPod touch

Who doesn't love a good puzzle game when on the go?  If you are looking for a fun game to add to your favorite handheld device, check out Topple from ngmoco.

Topple may look like a Tetris clone at first, however, the similarities end quickly.  In Topple, you take objects of varying shapes and stack them to the goal line before time runs out. It sounds easy at first but as the shapes get more unique it gets harder to keep the stack from collapsing.

Topple is available free of charge in the App Store for the iPhone and iPod touch.  Click here to download the game (link opens in iTunes).

To see the game in action, check out ngmoco's official site for Topple.  

Saturday, January 10, 2009

Putting Your Mac On A Sleep Schedule

These days it seems like everyone needs a "home server" to host media for their computers, game consoles, Apple TVs, and countless other devices.  While any computer with enough storage can provide this service, it can be a real energy waster during idle times.  Do you really need your computer running all day while you are at work?

If not, you can easily schedule your Mac to go to sleep at a scheduled time and wake up automatically.  Here's how it works:

First, open "System Preferences" and click "Energy Saver". It's the icon with the little lightbulb.

Next, click the "Schedule" button in the lower right hand corner of the window.

Now you can setup your schedule however you'd like! You can even tell OS X to only follow this schedule on Weekdays or Weekends.  

As cool as this feature is, you probably wouldn't have much use for it on a MacBook. Still, it can be very handy if you have a desktop and want to cut down that electric bill.